
(I originally posted this on my MSDN blog.)
This is not going to be a general-interest post so if you’re not interested in my GenesisEngine project or planetary terrain rendering, feel free to move along.
Ok, so someone recently sent me an email and asked me to write about the various coordinate systems in GenesisEngine. I defined them all briefly with comments in the source code (QuadMesh.cs) but there’s a lot more that could be said on the subject.
As I’ve said before, I’m not doing any original research here – I’m just borrowing ideas from other places and re-implementing them for my own amusement. For original material you might start with Jochen Winzen’s Interactive Visualization of a Planetary System paper and then move on to blogs such as the one for the Britonia project. This is a pretty complicated topic and I just barely understand it myself.
The problem
The biggest challenge one faces when building a real-time planetary terrain rendering system is that of numerical precision. First you want to be able to move around on the surface of the planet about six feet off the ground. For that we’d like to have terrain mesh resolution of about two meters or so, which requires at least centimeter-level precision in the vertices so we can get smooth elevation changes and have everything fit together nicely.
An earth-sized planet has a radius of 6,378,100 meters or 637,810,000 centimeters. That number contains nine significant digits, but unfortunately the 32-bit floating point data type only stores approximately seven significant digits. Of course you can use a float to store very large (and very small) numbers, far larger than 637,810,000, but you can only express those very large numbers with seven digits of precision which means you’re forced to round off the least significant digits when you go above the single millions. Rounding is fine when you’re observing the entire planet at once from far out in space but it’s completely unacceptable when you’re walking around on the surface.
To be absolutely clear, the issue here is the number of significant digits, not the order of magnitude of the values. Someone might say, “Oh, just use a coordinate system calibrated in kilometers so then your vertices only have to go out to 6378 or so. Problem solved!” Actually, no, because in order to let users walk around on a realistic surface your elevation heights are going to have to be specified as something like 6378.17473 km here and 6378.17485 km there, but a float can only store 6378.174 km. The last two digits just disappear.
We also have a 64-bit double-precision floating point data type available to us. A double can represent about 16 digits of precision, which turns out to be enough to model the entire solar system out to Neptune and beyond at millimeter-level precision. Yeah, there’s a big difference between 7 digits and 16 digits, isn’t there? So doubles solve our problem. Great!
Well, there’s one catch. XNA, and DirectX underneath it, and the graphics hardware underneath that, deals only with 32-bit floats. We can’t build a mesh with double-precision vertices and just tell XNA to render that mesh. We have to build a mesh using floats. We’re free to calculate the vertex positions and elevations using doubles but when we go to create an XNA VertexBuffer with that data we have to convert all of the numbers to floats which chops off digits that we really need to keep. Hmmm, what to do?
On top of that, we also need to wrestle with the fact that curves and spherical objects are hard to work with in a discrete format. Planes and grids we can easily do. Spheres, not so much. It would be great to do the heavy lifting in “flat plane” mode and only switch over to a spherical shape when we absolutely have to.
The solution to both problems is to work with several different coordinate systems, each of which are appropriate at a different stage of the mesh-generation pipeline. Whenever you look at spatial data you always have to keep in mind which coordinate system is being used so that you can understand it in context.
So let’s walk through the entire pipeline of a vertex in GenesisEngine from start to finish. This discussion would be helped a lot with some cool diagrams but I’m lazy so you’ll have to make do with a whole lot of words. Bear with me.
The planet in GenesisEngine is fundamentally represented by six square, flat quad-trees. Well, they start out as flat then become spherical somewhere along the way. If the camera gets too close and we need more detail than we have, we can split the quad into four equal pieces and repeat the following process for each one of the sub-quads. I’m not talking about the quad-tree subdivision in this post so all you really need to understand is that the planet starts out as a box, like this:

If we get a little closer each of the quads get split into four sub-quads, like this:
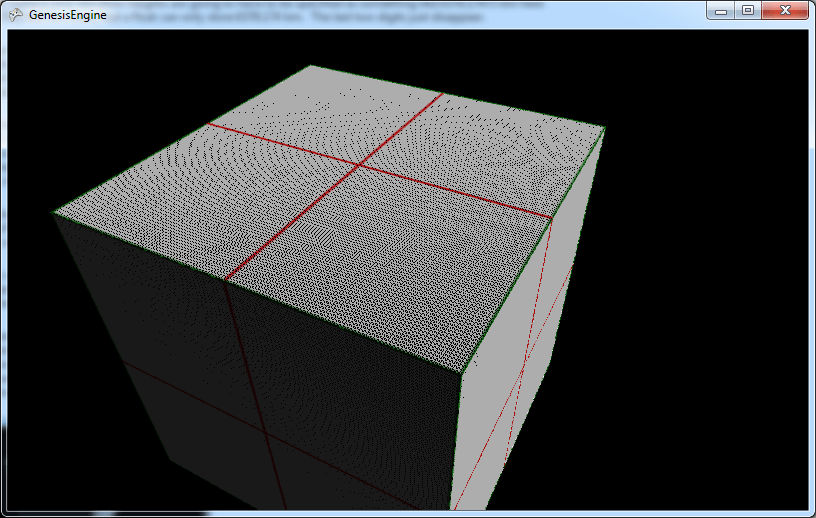
The green border lines indicate the area of the original quad and the red border lines indicate boundaries between sub-quads, which helps us keep track of where we are when things go spherical-shaped later on.
Quad grid space
The first coordinate system we have to deal with is what I named “quad grid” coordinates, which is simply the integer column and row of the vertex on the quad. This is a column-major system so the first number gives you the horizontal location and the second number gives you the vertical location. See the next screenshot below which makes the triangles and the vertices that define the triangles a little clearer. (I disabled updates for this shot in order to get in closer without having the quad split.) Each quad has a square grid of 65 by 65 vertices and the triangles are simply lines drawn between them. So a vertex starts life with an identity that says, “I’m the vertex on the 23rd column and the 37th row of this quad.” It doesn’t matter how big or small or how many levels deep the quad is because it’s all relative to the quad itself.

Unit plane space
However, the quad doesn’t exist in total isolation. It is a member of a group of 1..N quads that make up one of the six faces of the planet, so the next step is to describe this vertex in terms of where it is relative to the face. I called this coordinate system the “unit plane” system. Let’s define the face to have a extent from –1 to 1 in both directions, so 0,0 is exactly in the center of the face. (I guess that’s technically not a unit plane because it’s two units wide and long, but oh well.) Each quad has a certain position on that face and so does each of its vertices.
In the case where we haven’t split the original quad then the extents of the quad are the same as the extents of the face, from –1 to 1 in both directions. So the coordinates of the upper left vertex on this quad are -1, 1 and the lower right is 1, -1, and the rest of the vertices are evenly distributed in 64 equal steps between those extremes in both directions.
In the case where we have split the quad into four sub-quads, each of them covers one quarter of the face. (Refer to the sub-divided picture above.) So if we examine the upper left quad and consider its upper left vertex, it’s “unit plane” coordinates would be -1, 1 as with the parent quad but its lower right vertex would be 0, 0, which also happens to be the coordinates of the upper left vertex of the lower right quad.
It’s actually slightly more complicated in practice because we have six faces each facing a different direction in 3D space. The vertices in “unit plane” space are actually 3D vertices that describe a cube two units wide, long, and deep. For each face, two of the three x-y-z components vary to describe the locations on the face and the other is fixed at 1 or –1 as appropriate. 0,0,0 is the center of the cube (i.e. the center of the planet). These numbers are unitless so far and would be the same for planets of any real-world size.
Unit sphere space
Now that we have our vertices laid out in nice, evenly spaced rows and columns across our faces, it’s time to get spherical. Conceptually it’s not difficult to transform our vertices from box-like to sphere-like; we just bulge out the middles of each face and/or pull in the edges and presto, we have a sphere.
There are a couple of ways you can do the math here. The most straightforward way is to to take each vertex in “unit plane” space, treat it vector, and convert it to a unit length vector. Tada, instant sphere. This works ok but results in triangles of uneven sizes over the extents of the face. There is a better conversion algorithm that requires a bit more math but gives a nicer result and doesn’t cost that much more relative to everything else that’s going on. Follow the link to learn more about that.
Ok, so now we have our vertices transformed to “unit sphere” space, as in the picture below:

Planet space
Now it’s time to start thinking about real-world sizes. How big do you want this planet to be? In GenesisEngine the convention is that one unit in “planet space” coordinates represents one meter of length. To convert from “unit sphere” coordinates to “planet space” coordinates we simply multiply the vertex vector by the desired radius of the planet in meters. If we want to do varied terrain heights, which we do because that’s kind of the point of this project, we would add the terrain height at this location to the planet radius before multiplying with vertex vector. Now we have a lovely full-sized planet.
Mesh space
Up to this point all of the math has been done using doubles. Now it’s getting close to the time when we have to convert all of these numbers into a mesh we can render, but this is where we run into our issue with significant digits. We’ve done all of this work to get beautifully precise numbers that describe every elegant rise and fall of our terrain. We don’t really want to dump them into the meat grinder of 32-bit floats.
The trick here is to temporarily change the origin point of the vertex data so that the origin is exactly in the center of each mesh, or to say it another way, we’re going to translate the geometry of each quad down to the planetary origin so that the overall range of numbers isn’t so large. This puts us into “mesh space” which is the same as “planet space” except that the planet is now disassembled and all of its individual quads are jumbled up on top of each other at the center of the planet. We also remember where each quad mesh is supposed to be located on the planet’s surface so we can reconstruct it in its proper location later.
What good does that do us? I said above that merely changing the order of magnitude of our coordinate system doesn’t help us with the significant digit problem, which is still true. What we’re doing here is something different; we’re keeping the order of magnitude of the coordinate system the same but we’re collapsing the range of values we need to express into just a small part of that range, which reduces the number of significant digits we need to express them.
Think of it this way: how many significant digits do we need to express the number 12,464,297? Eight digits, too many for a float. But what if we subtract out the 12,000,000 part and hold it somewhere off to the side? How many significant digits do we need to represent 464,297? Only six digits, which does fit in a float. That doesn’t solve anything if you’re talking only one big number but if you have 65 x 65 = 4,225 big numbers, all of which are relatively close to the same size, then you can subtract some appropriate big number from all of them and be left with 4,225 small numbers to deal with.
Rendering big numbers without big numbers
Ok, once the vertices are translated into “mesh space” we finally have numbers that both (indirectly) represent the real world and are suitable for storage in floats. We can build our vertex buffers from these vertices and send them to the graphics card.
But the mesh data we send to the graphics card is all jumbled up in the same small area. It’s not planet-like, so how do we reconstruct the planet? We could set our world matrix to translate each XNA mesh back to where it’s supposed to be but that kills our precision. Well, this is where we play a coordinate-system trick with the camera. Instead of moving the view frustum around in our real-world coordinate space, we keep the view frustum fixed at the origin point and we rotate and translate every piece of geometry in the world around the view point. It’s kind of like driving down the freeway and imaging that your car is fixed in space while the earth spins beneath it.
How does that solve our problem? Well, any geometry that’s close to the camera is going to be rendered close to the origin (i.e. using small numbers) on the graphics card, so those vertices won’t blow the float digit budget. Any geometry that’s far away from the camera will be rendered far away from the origin (i.e. using big precision-losing numbers) on the graphics card but that doesn’t matter because they’re far away and small. Rounding is ok if the viewer isn’t close enough to see the damage.
Specifically, we take a mesh that’s encoded to be centered around the origin, and we get its original location relative to the center of the planet (which is still stored in doubles). We also get the location of the camera in real-world space (also stored in doubles). We subtract the camera location from the original location of the mesh which gives us the location of the mesh relative to the camera (in “camera space”, I guess), and that tells us how much we need to translate the encoded mesh away from the real-world origin in order to appear in the view frustum exactly the same way it would appear if both the mesh and the view frustum were where they were supposed to be in real-world space (which they’re not).
The end result is that all of the numbers stored in 32-bit floats never represent full coordinate values in the world. They only represent differences from some reference value. We can manipulate the reference value to tell us where we need to tell the graphics card to draw the geometry such that everything appears to be in its proper place, even though to the graphics card itself the perspective is quite different. The important numbers (the ones we see up close and personal) always stay relatively small while in float form and everybody’s happy.
As I said, it’s complicated.
