
(I originally posted this on my MSDN blog.)
My smart card renewal tool uses an authenticated SSL connection to communicate with a WCF web service hosted in IIS; that is, a client certificate is required for connection and IIS automatically maps that certificate into a domain account identity so I can impersonate it.
Using WCF in this situation is pretty straightforward but there are a few fiddly details that may not be obvious at first. Here’s how to do it. As with the smart card stuff, I’m not an expert on this topic. What follows is just what I’ve discovered through research and experimentation.
The Client
On the client side you have the ServiceModel configuration section in your app.config file and a few lines of code to connect to the server. The configuration looks like this:
<system.serviceModel>
<client>
<endpoint name=“IMyService“
address=https://myserver/myservice/MyService.svc
binding=“wsHttpBinding“
bindingConfiguration=“wsHttpBindingAuthenticated“
contract=“MyApp.Contracts.IMyService“>
</endpoint>
</client>
<bindings>
<wsHttpBinding>
<binding name=“wsHttpBindingAuthenticated“useDefaultWebProxy=“true“>
<security mode=“Transport“>
<transport clientCredentialType=“Certificate“/>
</security>
</binding>
</wsHttpBinding>
</bindings>
</system.serviceModel>
In this example the name of the endpoint is the name of the contract I’m exposing through WCF. It can be anything you like but I like to use the contract name to reduce confusion. The address setting is the URL to the .svc file hosted in IIS. The contract setting is the fully-qualified name of contract interface. The rest of it is just telling WCF to rely on the SSL connection for security and to present a client certificate upon connection.
The code in the client is pretty trivial. It sets up a channel factory, configures the client certificate to use, and creates a channel. Very simple.
var channelFactory = new ChannelFactory<IMyService>(“IMyService”);
channelFactory.Credentials.ClientCertificate.Certificate = certificate.X509Certificate;
IMyService myService = channelFactory.CreateChannel();
However, when you actually make calls on your service you’ll need to trap all kinds of possible exceptions and do something intelligent with them. You should go through all the possibilities you can think of – server name not resolved, server not responding, IIS disabled, incorrect service URL, client network down, etc., etc. I have nearly 100 lines of code in my app just to catch various exceptions that might be thrown when I try to use my WCF service and to turn them into friendly error messages that suggest possible causes and solutions.
The Server
The server is slightly more complicated but not too bad if you know exactly what needs to be done. First is the ServiceModel configuration in the web.config file:
<system.serviceModel>
<services>
<service name=“MyApp.Service.MyService“
behaviorConfiguration=“MyApp.Service.MyServiceBehavior“>
<endpoint address=“”
binding=“wsHttpBinding“
bindingConfiguration=“wsHttpBindingAuthenticated“
contract=“MyApp.Contracts.IMyService“ />
</service>
</services>
<behaviors>
<serviceBehaviors>
<behavior name=“MyApp.Service.MyServiceBehavior“>
<serviceMetadata httpGetEnabled=“false“/>
<serviceDebug includeExceptionDetailInFaults=“False“ />
<serviceCredentials>
<clientCertificate>
<authentication mapClientCertificateToWindowsAccount=“true“ />
</clientCertificate>
</serviceCredentials>
</behavior>
</serviceBehaviors>
</behaviors>
<bindings>
<wsHttpBinding>
<binding name=“wsHttpBindingAuthenticated“>
<security mode=“Transport“>
<transport clientCredentialType=“Certificate“/>
</security>
</binding>
</wsHttpBinding>
</bindings>
</system.serviceModel>
In this configuration the service name is the fully-qualified name of the concrete class that implements the service contract interface. The endpoint doesn’t need to specify an address since that will be taken care of by IIS, and the contract setting refers to the fully-qualified name of the contract interface just as in the client configuration.
The behavior section turns off some WCF options and turns on the option to automatically map the client certificate to the corresponding Windows domain account.
The binding section is the same as in the client config and tells WCF to rely on SSL for security and to expect a client certificate as proof of identity.
The .svc file is just one line:
<%@ ServiceHost Service=”MyApp.Service.MyService“ %>
The .svc file is the file that the client URL will point to; this is the entry point that IIS uses to figure out which concrete class to instantiate and expose to incoming requests.
The concrete class that implements the service contract has no special magic in it at all so I won’t bother to show it here. The only requirement is that you implement a default constructor on the class. IIS will instantiate an instance of the class for you and invoke the method that the client requested.
IIS
There is also some configuration you need to do in IIS.
First, I assume you have a proper SSL certificate set up for your server. If you want to create a self-signed certificate for your development environment, there are excellent instructions available on how to do so.
Second, you need to install the “Client Certificate Mapping Authentication” component for the Web Server server role. In Windows Server 2008, you can find the web server role in the Server Manager:

Click the “Web Server (IIS)” role, click “Add Role Services, and make sure that both the Windows Authentication and the Client Certificate Mapping Authentication services are selected. You don’t want IIS Client Certificate Mapping Authentication unless you want to explicitly map multiple certificates to a single domain account.

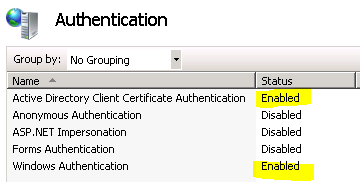
In IIS Manager, first look at the Authentication page for your web server (not for the web application) and enable both “Active Directory Client Certificate Authentication” and “Windows Authentication”.
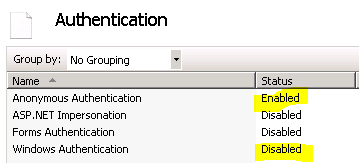
Next, look at the Authentication page for your web application and make sure that “Windows Authentication” is enabled and that “Anonymous Authentication” is disabled:

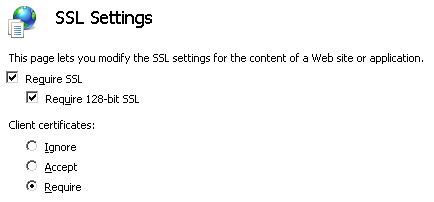
View the SSL page for your web application and make sure that it’s configured to require SSL and to require a client certificate:
The final step is that your .svc file (and nothing else) needs to be configured to allow anonymous authentication. Doing this in IIS Manager is a little non-obvious the first time.
- In your web application, switch to Content View.
- Find your .svc file, right-click on it, and choose “Switch To Features View”.
- Now the .svc file will be displayed in the left-hand tree view under your web application. Select it and look at the Authentication page for this one file (not the entire web app). Enable Anonymous Authentication and turn off everything else:
Impersonation
After you successfully build, deploy, and configure all of that, you should be able to connect to your web service using a client certificate and IIS will automatically map that to a Windows domain account. If you check ServiceSecurityContext.Current.WindowsIdentity in your web service code, you’ll see the name of the domain account that the certificate was issued to. However, you’re still not running in full impersonation mode! In order to have the web service fully act as the user you need to call ServiceSecurityContext.Current.WindowsIdentity.Impersonate() and then do your work, like so:
using (ServiceSecurityContext.Current.WindowsIdentity.Impersonate())
{
// Act as the user here.
}
While impersonating the user you can do anything you’d like with resources on the web server machine. However, if you want to touch anything on a different machine you’ll need to set up constrained Kerberos delegation between the two machines because that counts as a double hop (the hop from the client machine to the web server is the first one) so it will be disallowed by default. I’ll post about that soon.
